Showing posts with label How to. Show all posts

Friday, December 18, 2015

How to remove time-to-read.ru

Time-to-read is a browser-hijacker. It is disguised as a search engine but in fact it redirects all search queries to go.mail.ru. As a rule this intrusive website appears in all installed browsers: Chrome, Firefox, Opera, Internet Explorer, etc. It has a lot of domains-redirectors. They all redirect to:

http://time-to-read.ru/?utm_source=startpm

Below you will find the step by step guide and a video guide about how to get rid of time-to-read.ru in the browser.


How to remove time-to-read

1. Scan system with HijackThis

Download the TrendMicro HihackThis tool.
Run it and press Scan.
Inspect the list thoroughly. Select the items that contain unknown URLs or domain names and press Fix checked:


2. Scan with AdwCleaner

Download the latest version of the AdwCleaner utility. Press “Scan”, wait and then press “Clean” to remove time-to-read.ru virus installer and task:


3. Scan with HitmanPro

Download HitmanPro. Scan the system and remove all found malicious programs:

Friday, September 27, 2013

How To Change Inches To Centimeters In wORD 2007, Word 2010

By default in Microsoft Word 2010, width, height, and even paper size is shown in inches. For some people this is an obscure measurement that is hardly ever used. If you’d rather display in centimeters instead, let’s take a look at how we can change the default measurement unit from inches to centimeters.

Click on the File Menu and select  Options:

Now click on the Advanced section:

Scroll down to the Display section and change the the option to display measurements in to centimeters, by selecting it from the drop-down menu:
If you use the rulers you will immediately notice a difference:


Friday, September 13, 2013

How to block ads in website. Remove ads from website.

सफ्टवेयर राखेर पनि वेबसाइट र मेसेन्जरहरुमा आउने विज्ञापन रोक्न सकिन्छ 


इन्टरनेट चलाउनेहरुलाई विभिन्न वेबसाइट खोल्दा आउने विज्ञापनहरुले हैरान नै पारेको हुनुपर्छ। कम्प्युटर तथा मोबाइलको स्क्रिन नै ढाक्ने गरेर ढकमक्क देखिने विज्ञापनहरुले वेबसाइटमा रहेका सामग्री हेर्न मात्र मुस्किल पार्दैनन् तल माथि र दायाँ बायाँ एकोनास हल्लीरहने विज्ञापनले ध्यान पनि भंग गराउँछन्। यती मात्र होइन वेबसाइट हेर्नेहरुले गल्तीले क्लिक गरोस् भनेर नै सामग्रीहरुको लिंकमा टाँसेरै विज्ञापन राख्नेहरु पनि धेरै छन्। जसले गर्दा तपाइँ आफूले हेर्न चाहेको विषय भन्दा फरक लिंक र ठाउँमा पुग्नुहुन्छ। यसले दिने हैरानी त छँदैछ यस्ता विज्ञापनले तपाइँको इन्टरनेटको गती सुस्तो बनाएर हैरान बनाउँछन्। वेबसाइटहरु धेरै ढिलो खुल्दा तपाइँलाई रिस उठ्नु पनि स्वभाविक नै हो। कतिपय नेपाली वेबसाइटमा छ ठूला ठूला आकारका र पाठकको आँखालाई ख्यालै नगरी डिजाइन गरिएका भद्दा विज्ञापनको संख्या पनि धेरै नै हुन्छ। जसले आँखालाई असजिलो त पार्छ नै इन्टरनेटको गती पनि सुस्तो हुन्छ। भोल्युम बेस इन्टरनेट लिनेलाई त त्यस्ता विज्ञापनले अनावश्यक धेरै पैसा पनि खर्च गराउँछ।

इन्टरनेट प्रयोगका क्रममा दैनिक साक्षात्कार हुने यस्ता विज्ञापन र तिनले दिने हैरानीबाट जोगिन प्रमुख इन्टरनेट ब्राउजरहरुमा यस्ता विज्ञापन रोक्ने एडअन्स (सफ्टवेयर)हरु पनि विकास भएका छन्। जसले तपाइँलाई त्यस्ता विज्ञापन जसले फोकटमा पैसा खान्छन् र हैरानी दिन्छन् तीनलाई सँधैका लागि बाइबाइ गर्न सक्नुहुन्छ सित्तैमा। प्रमुख पाँच इन्टरनेट ब्राउजरमा यस्ता खालका एडअन एप राख्न सक्नुहुन्छ।


Install ABP Ad Blocker


Friday, August 30, 2013

What is Hibernate? What is hiberfil.sys and How Do I Delete It?

hiberfil.sys : is a file used by windows when you choose to 'Hibernate' the system. You can  delete it, if you won't use the Hibernate option.

pagefile.sys : is the file used by windows to be your Page File, or your virtual memory swap. If you have 1 GB of RAM and want to use 2 GB as your memory, windows will create a 1 GB virtual memory in your HD and use it as needed.

Can you delete them? Yes, but not simply going to the Windows Explorer and removing them. Take a look at the provided links, or do some research about your windows version, to know how to delete them.
Notice that simply deleting them is not enough: you'll have to disable the hibernate option and the virtual memory use of your windows.

Hiberfil.sys, as the name suggests, is the file to which Windows saves the snap shot data. Thus, the file is always equal in size to the total amount of available RAM on the computer.
To remove the file and disable hibernation.
1.Open a command prompt with administrative privileges.
2.Enter “powercfg.exe -h off”.

What is hiberfil.sys and How Do I Delete It?

You’re no doubt reading this article because there’s a gigantic hiberfil.sys file sitting in the root of your drive, and you want to get rid of it to free up some space… but you can’t!
Luckily, you actually can delete it, and today we’ll show you how.
image
The more memory you have in your PC, the bigger the file will be.

So What is hiberfil.sys Anyway?
Windows has two power management modes that you can choose from: one is Sleep Mode, which keeps the PC running in a low power state so you can almost instantly get back to what you were working on. The other is Hibernate mode, which completely writes the memory out to the hard drive, and then powers the PC down entirely, so you can even take the battery out, put it back in, start back up, and be right back where you were.

Hibernate mode uses the hiberfil.sys file to store the the current state (memory) of the PC, and since it’s managed by Windows, you can’t delete the file.

So if you never use it, and want to disable Hibernate mode, keep reading. Personally I stick with Sleep Mode the vast majority of the time, but I do use Hibernate quite often.

Disable Hibernate (and Delete hiberfil.sys) in Windows 7 or Vista
You’ll need to open an administrator mode command prompt by right-clicking on the command prompt in the start menu, and then choosing Run as Administrator. Once you’re there, type in the following command:
powercfg -h off

You should immediately notice that the Hibernate option is gone from the Shut down menu.

You’ll also notice that the file is magically gone!


Disabling Hibernate Mode in Windows XP
It’s a lot easier in Windows XP to get rid of Hibernate mode… in fact, we’ve already covered it before, but we’ll cover it again. Just head into Control Panel –> Power Options, and then find the Hibernate tab.

Uncheck the box, reboot your PC, and then you can delete the hiberfil.sys file

Monday, August 19, 2013

How To Make Easy Shut Down Icon/Tile In Windows 8 Start up Screen

Are you happy with shutdown process of windows 8? Are you feeling bit uncomfortable with windows 8. Do you fancy a shut down button on the desktop as a tile on your windows 8 computer?

Here we are going to present a very simple and easy process to create a shut down tile on windows 8. So that you can shut down your PC with one click only. This is a hidden secret of windows 8 which is safe to use.
Process:
  • Right click on the desktop and choose New then Shortcuts.
  • Go to the Location Field, type shutdown/p then click Next.
  • Choose different name for the shortcut or leave it as Shutdown then click Finish.
  • Now you can see a shortcut of shutdown.
To change Icon Image:
  • Right click on the shortcut and click on Properties.
  • Choose Change Icon, then you can select a best icon from list of available icons. We recommend all to choose a red colored power button for better icon.
  • Press Ok then click Apply and then Ok.
  • Now you can see new changed icon.

Now Lets move that shortcut to start screen:
  • Right click on new shortcut and choose Pin to Start. Now you can check by pressing (WIN key) to go to the start screen to see your shut down icon.
  • You can see shut down icon on far left corner of the start up screen now just simply drag to bring that icon in your favorite place which you think appropriate for you.
Now you can enjoy shut down shortcut in your start up screen!!!!!

Thursday, April 11, 2013

Titling your Facebook Post as you need

You can change the title tag and descriptions of any post you share on Facebook to suit your needs (Especially useful for SEO purposes). This will ensure you’re getting the right message off to your friends.

1. After you pop the link into your status box, you can hover over the title of the post. (Highlighted in yellow)


2. Click on the title and it turns into an editable box.

Change title on Facebook share

3. Enter your desired text and press enter.

Facebook Title Changing

4. Customize the description using the same steps.

Customize Facebook Descriptions

Facebook description customizing

Monday, April 8, 2013

Display Blogger Labels In A Drop Down Menu Gadget

A labels widget displays your post labels. Each label is linked to a page containing posts which fall under that label. Usually as your posts increases, so will your labels. If you don’t limit them, sooner or later your labels widget will take over your sidebar :)

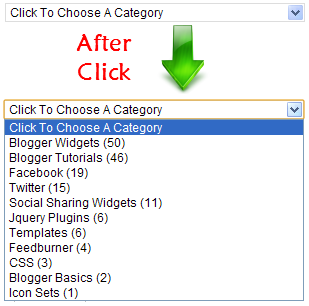
Regain control of your sidebar, shrink the widget -by converting it into a dropdown (or is it a pulldown?) menu. Your labels widget size will be reduced to just one line! And only expand into a full list when you click it.


Before applying this hack, you must already have a Label widget installed.
If you don’t have one, go to Design > Page Elements and add it.
Now let’s make the dropdown:

How To Create Dropdown Menu For Labels Widget

  • 1. Go to Dashboard > Design > Edit HTML.
  • 2. Back up your template.
  • 3. Make sure you DO NOT tick the Expand Widget Templates checkbox.
  • 4. Look for the following lines in your HTML code:
<b:widget id='Label1' locked='false' 
title='Labels' type='Label'/>

  • 5. Replace that line with this code:
<b:widget id='Label1' locked='false' 
title='Categories' type='Label'> 
<b:includable id='main'> 
<b:if cond='data:title'> 
<h2><data:title/></h2> 
</b:if> 
<div class='widget-content'> 
<select style='width:100%' 
onchange='location=this.options[this.selectedIndex].value;'> 
<option>Click To Choose a Category</option> 
<b:loop values='data:labels' var='label'> 
<option expr:value='data:label.url'><data:label.name/> 
(<data:label.count/>) 
</option> 
</b:loop> 
</select> 
<b:include name='quickedit'/> 
</div> 
</b:includable> 
</b:widget>
  • 6. If you want change the width of the drop down menu then change this value width:100% to any percentage, or pixel (px).
  • 7. To change the phrase “Click To Choose a Category” then find this line Click To Choose a Category  and replace it with your preferred phrase.
  • 8. If you do not want to show post count at the end of each label then delete this line (<data:label.count/>) .

Sunday, April 7, 2013

कम्प्युटरमा भाइरस पसेको कसरी थाहा पाउने ? कसरी बच्ने ?

हामी अहिले साइबर युद्धको युगमा छौँ । तपाइँलाई थाहै नदिइकन तपाइँको कम्प्युटर भाइरसद्धारा संक्रमित हुनसक्छ र अदृश्य ठाउँबाट कुनै ह्याकरले तपाइँको कम्प्युटर नियन्त्रण गरिरहेको हुनसक्छ । तपाइँको ल्यापटपका डाटाहरु साइबर अपराधीहरुले चोर्ने खतरा पनि हुन्छ ।

त्यसैले आफ्नो पिसिलाई ह्याक हुनबाट वा भाइरसबाट जोगाउन सचेत हुनुपर्छ । कम्प्युटरमा भाइरस घुसेको थाहा पाउने केही लक्षण निम्न छन् :
  • 1. पिसीको गति निकै स्लो हुन्छ । कम्प्युटरमा धेरै डाटा लोड नहुँदा पनि गति निकै स्लो हुन थाल्छ ।
  • 2. इन्टरनेट ब्राउजर आफै खुल्ने वा पपअप विन्डो आफै खुल्ने भयो भने पनि भाइरस छिरेको लक्षण हो । ब्राउजर बन्द गर्दा पनि बन्द हुनेबित्तिकै आफै खुल्ने लक्षण पनि भाइरस संक्रमणको हुनसक्छ ।
  • 3. कम्प्युटरमा सेक्युरिटी विज्ञापन आफै देखिनु, ल्यापटप संक्रमित भएको चेतावनी जारी हुनु तथा सेक्युरिटी सफ्टवेयर डाउनलोड गर्न आफै सूचना पप अप हुन्छ ।
  • 4. इन्टरनेट खोल्दा आफुले अर्कै बेवसाइट लगअन गरेको बेला अर्कैमा रिडाइरेक्ट हुनु ।
  • 5. अनावश्यक वा चिन्दै नचिनेका वा अप्रासंगिक इमेल आउनु, फेसबुक वालमा आफुले पोष्ट गर्दै नगरेका कुराहरु पोष्ट हुनु ।

कसरी जोगिने ?

  • 1. पेनड्राइभ ल्यापटपमा घुसाउँदा सुरुमा भाइरस स्क्यान गरिसकेपछि मात्र खोल्नुहोस् ।
  • 2. तपाइँको इमेलमा आएको वा अरु कुनै साइट खोल्दा ध्यान दिनुहोस् । यदि उक्त वेबसाइट आधिकारिक वा सुरक्षित हो भन्नेमा तपाइँ ढुक्क हुनुहुन्न भने त्यसमा क्लिक नगर्नुहोस् ।
  • 3. इमेल तथा सोसल नेटवर्कमा पठाइएका विभिन्न खाले बधाइ तथा शुभकामना लगायतका शंकास्पद इमेल खोल्ने तथा त्यसमा दिइएका लिंक ओपन गर्ने गर्नुहुँदैन । त्यस्ता शंकास्पद इमेललाई सोझै डिलिट गर्नुहोस् ।

लिंक सुरक्षित हो वा भाइरस जन्य हो भन्ने कुरा कसरी थाहा पाउने ?

  • 1. तपाइँलाई पठाइएको वा लगअन गर्न खोजेको साइटको लिंक युआरएल निम्न लिंक safeweb.norton.com र siteadvisor.com मा गएर टाइप गर्नुहोस त्यसपछि त्यो साइट सुरक्षित हो की भाइरसजन्य हो थाहा हुन्छ ।

Image Zoom Effect Eample

A camera shot that changes smoothly from a long shot to a close-up or vice versa.

A zoom lens is a mechanical assembly of lens elements for which the focal length (and thus angle of view) can be varied, as opposed to a fixed focal length (FFL) lens (see prime lens).

A true zoom lens, also called a parfocal lens, is one that maintains focus when its focal length changes. A lens that loses focus during zooming is more properly called a varifocal lens.


Add Zoom Hover Effect To Blogger Images, Zoom Effect on Image for Website

This is pure CSS tutorial,it will help you to make your blog attractive,if you are running photography blog then this effect is best for you.

Whenever any one mouse-over the image the image will automatically grow in size and after removing mouse it will come back in its own position.


If you want to add this effect to your blog then follow below steps-

Adding CSS Code

Paste the following Css code above ]]></b:skin> in your blog html code section.If you don't know how to paste Css then go to Template>Edit HTML>And there find (ctrl + f) ]]></b:skin> and paste following code above it.


.hovergallery img{
-webkit-transform:scale(0.8); /*Webkit: Scale down image to 0.8x original size*/
-moz-transform:scale(0.8); /*Mozilla scale version*/
-o-transform:scale(0.8); /*Opera scale version*/
-webkit-transition-duration: 0.5s; /*Webkit: Animation duration*/
-moz-transition-duration: 0.5s; /*Mozilla duration version*/
-o-transition-duration: 0.5s; /*Opera duration version*/
}
.hovergallery img:hover{
-webkit-transform:scale(1.1); /*Webkit: Scale up image to 1.2x original size*/
-moz-transform:scale(1.1); /*Mozilla scale version*/
-o-transform:scale(1.1); /*Opera scale version*/
opacity: 1;
}

Now we need to add image,select image in blogger where you want to add this effect and follow below steps-

<a class="hovergallery" href="Image-URL"><img src=" Image-URL " /></a>

Replace Image-URL with your image in which you want zoom hover effect.

After Adding Image URL place the code where you want to display this image.

If You Are Facing Any Problem Feel Free To Ask By Commenting below.

Friday, April 5, 2013

Make your computer welcomes you when you log on. Welcome Greeting

This is very simple and cool trick to impress your friend.

in this trick when you start you computer it will say "Welcome Back,your name"
and can use your own msg..

isn't it cool..!!

lets start the tricks.

just follow these steps.

1.Open notepad and copy the code in it.
code is.

Dim speaks, speech
speaks="Welcome Back, yourname"
Set speech=CreateObject("sapi.spvoice")
speech.Speak speaks


2. Put your name at the place of your name.
3. Save this with the name of welcome.vbs
4.  Copy File welcome.vbs and paste it in startup folder from --> Start Button --> All Programs -->Startup

done, now just do log of your computer and log in again...it will welcome you.

Sunday, March 31, 2013

Preeti to Unicode Converter, Unicode to Preeti Converter

Online unicode nepali type and converter. If you are intrested to write in Unicode Nepali font, then it is. This online unicode nepali will automatically convert any roman english text into unicode nepali.


Simple Preeti to Unicode Conberter.
Type or Paste your contents typed in Preeti font and just click on Convert to Unicode button

Unicode Converter
Nepali font text-box (Use Preeti)
तलको बक्समा प्रीति फन्टका अक्षर पेस्ट गर्नुहोस्: 

Unicode text-box
माथीको प्रीति फन्ट अनुसारको युनिकोड, यो बक्समा हेर्नुहोस् : 


युनिकोडलाई प्रीति फन्टमा बदल्न माथीको बटनमा क्लिक गर्नूस ।


Saturday, March 30, 2013

Facebook Status in Blue Linked Text

Update Facebook Status In Blue Text..!!

This trick is really Impressive and easy , Its make your status Unique and Different from Others status..!!


Just copy the below code and paste in your status,

Code is

@@[0:[1066722575]:1: This is me]
@[1066722575:0]


:: 1066722575 is my facebook ID. Every profile has unique ID.


How to get your profile ID.

1. Open your browser.
2. Type the following
     http://graph.facebook.com/prajapatibm
    prajapatibm = replace with your profile name


{
   "id": "1066722575",
   "name": "Mukund Prajapati",
   "first_name": "Mukund",
   "last_name": "Prajapati",
   "link": "https://www.facebook.com/prajapatibm",
   "username": "prajapatibm",
   "gender": "male",
   "locale": "en_US"
}


Monday, March 25, 2013

How to Block Websites on Chrome

Block websites on chrome
Sometimes you need to block some sites that contain nudity or unnecessary content because you never want your children to visit this type of sites. There may be another reasons to block websites.
We have already talked about blocking websites but that trick was only for Internet Explorer but today we are talking about blocking websites on Google Chrome.
If you want to block websites on internet explorer, you can see this post: How to block websites on internet explorer.
And, if you want to block a website on chrome then keep on reading.

Things you will need

  1. Internet access
  2. Google Chrome browser
  3. A Chrome Extension named Block Site.
I hope that you have the first two things, but you may not have the last one Block site

Installing Chrome Extension 'Block Site'

1. Go to this link from your chrome browser: Block site.
2. Click on add to chrome and add it.
Add to chrome
3. After adding this extension you will see a small icon of the extension on the top right corner of your chrome browser.

You have successfully installed the extension Block site and its time to block websites on chrome using this extension.

How Block websites on chrome using Block Site

Here is how to block websites on chrome using Block sites.
1. Click on the small icon of the extension that we recently added. This icon is located on top right corner of your chrome browser.
Block Site
2. Click on options.
3. Add a list of URL you want to block.
4. Make it as blacklist.
5. Click on enable authentication and set your password and don't forget to tick on Enable Block Site.
Block site settings
Now, whenever someone wants to access the URL that you have blocked will see this page and will not be able to enter on that site.
Block websites on chrome
If you want to block all websites and give access to some sites, then choose Whitelist instead of Blacklist.

This was the simple trick on how to block websites on chrome.
 

How to Make an Invisible Folder, Tips, Tricks

Invisible folder is like a hidden file on your computer since you can hide any file within the folder. It is useful to make invisible folder(s) if you are using the computer which is used by some other people, like your friends and/or family.

Today, you will learn a simple trick to make invisible folders.

It sounds so hard to make invisible folders but it is very simple indeed. You don't need to download anything. All you need to do is to follow these simple steps.


Note: This trick works on Windows xp, Vista, 7 & 8. It may work on some other windows versions but I am not sure about it.

How to Make an Invisible Folder

Here is how to make an invisible folder.
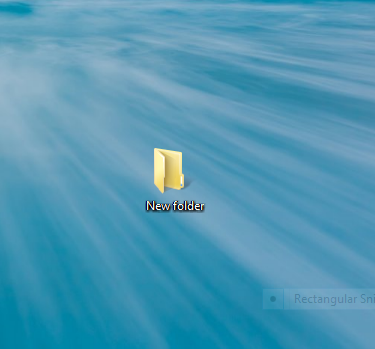
1. First make a simple folder, just a simple folder which you usally make.

New folder

2. Right click on the folder and click Properties. You will see a new pop up window after clicking Properties.

3. Switch to the customize tab now.

Customize new folder

4. Click on Change Icon.

Change folder icon

5. You will see lots of icons there. You have to find a transparent icon from there it is usually located in the middle. Click on the transparent icon the. click OK >> Apply and OK again.

Transparent icons


Here is a screenshot of how your new folder is looking now.

Invisible folder


You are almost done. :) But there is one thing left and that the name of the folder. It is still visible.  Now, it's time to make it invisible.

6. Right click on the folder and click Rename. Press and hold the Alt key, now press "0160" and then leave the alt key. The folder name should be removed now.

7. Make sure that your Num Lock key is on when when pressing 0160.

Congratulations! you have done it. You can now save your secret files,passwords, email or anything which you want under this invisible folder.

Friday, March 15, 2013

Windows 7 मा Hard Drive लाई फरम्याट नगरि कसरी Partition गर्ने

टेक्निकल दुनियाँमा नयाँ नयाँ अपरेटिङग सिस्टमको आगमन सँगै पुरानाको तुलनामा अझ धेरै सुबिधाहरु थपिएर आएका छन । हालै चलन चल्तीमा रहेको अपरेटिङग सिस्टम Windows 7 तथा Vista मा Disk Partition सजिलै गर्न सकिन्छ । पुराना अपरेटिङग सिस्टममा एक चोटि Partition गरिसकेको Hard Drive लाई फेरी partition गर्नु परेमा Format नै गर्नु पर्ने समस्या हालका अपरेटिङग सिस्टममा छैन । यहाँ चर्चा गर्न लागिएको सिस्टम windows 7 मा तपाईंले सजिलै कम्प्युटर फरम्याट नगरीकनै आफ्नो hard drive लाई Partition गर्न सक्नु हुनेछ । Disk management मा उपलब्ध Shrinking र expanding utility प्रोग्रामको सहायताले तपाईंले Partition मात्र हैन drive डिलिट तथा re-size पनि गर्न सक्नु हुनेछ ।

अब यहाँ Hard Drive लाई कसरी partition गर्ने भन्ने बारे Step by Step चर्चा गरौ :
1. सर्वप्रथम "start" बटनमा क्लिक गरौ, त्यहा देखिएको "Computer" मा राईट क्लिक गरौ र "manage" option मा जाऔ ।

2. "Computer Management" नामको नयाँ window खुल्नेछ, त्यहा "Storage" मा क्लिक गरौ र "Disk Management" मा जाऔ ।

3. "Disk Management" मा गईसकेपछि तपाईंले आफ्नो कम्प्युटरमा भएको Drive हरु देख् न सक्नुहुनेछ ।

4. अब तपाईंले कुन drive लाई partition गर्न खोज्नु भएको हो त्यो "Drive" लाई राईट क्लिक गर्नुहोस् र "Shrink Volume" option लाई छान्नुहोस् ।

5. नयाँ window खुल्नेछ जसमा उक्त Drive को Size, Partition को लागि उपलब्ध space र नयाँ partition मा कति amount को space भएको Drive बनाउने भन्ने option हुनेछ । त्यहा तपाईंले नयाँ Partition गर्दा बन्ने drive कती space को बनाउने हो त्यो Value भर्नु पर्नेछ । याद राख्नुहोस् त्यहा Size of available shrink space मा देखिएको भन्दा बढी Space Value त्यहा राख्न पाउनु हुन्न ।

6. Value राखीसकेपछि Shrink बटन क्लिक गर्नुहोस् र process सकिन केही समय पर्खिनुहोस् । operation सकिएपछि त्यहा तपाईंले unallocate space र तपाईंले अघि राख्न नु भएको exactly value भएको खाली drive देख् नु हुनेछ । अब त्यो unallocated space लेखिएको drive लाई सेलेक्ट गर्नुहोस् र राईट क्लिक गरेर "New Sample Volume" option मा जानुहोस् ।

7. त्यहा नयाँ बन्ने Volume को लेटर कुन राख् ने छान्नुहोस् र next बटन क्लिक गर्नुहोस् ।

8. अब Format पेज देखिनेछ यहाँ निर ध्यान दिनुहोस् कि File System NTFS सेलेक्ट गर्नुहोस् र Volume Label मा उक्त volume को नाम कुन राख् ने हो लेख्नुहोस् ।

9. Next बटन क्लिक गर्नुहोस् र अन्तिममा Finish गर्नुहोस् ।

Wednesday, February 27, 2013

Windows Run Commands, Shortcut Collections


Windows
Calc - Calculator
Cfgwiz32 - ISDN Configuration Wizard
Charmap - Character Map
Chkdisk - Repair damaged files
Cleanmgr - Cleans up hard drives
Clipbrd - Windows Clipboard viewer
Cmd - Opens a new Command Window (cmd.exe)
Control - Displays Control Panel
Dcomcnfg - DCOM user security
Debug - Assembly language programming tool
Defrag - Defragmentation tool
Drwatson - Records programs crash & snapshots
Dxdiag - DirectX Diagnostic Utility
Explorer - Windows Explorer
Fontview - Graphical font viewer
Ftp - ftp.exe program
Hostname - Returns Computer's name
Ipconfig - Displays IP configuration for all network adapters
Jview - Microsoft Command-line Loader for Java classes
MMC - Microsoft Management Console
Msconfig - Configuration to edit startup files
Msinfo32 - Microsoft System Information Utility
Nbtstat - Displays stats and current connections using NetBios over TCP/IP
Netstat - Displays all active network connections
Nslookup - Returns your local DNS server
Odbcad32 - ODBC Data Source Administrator
Ping - Sends data to a specified host/IP
Regedit - registry Editor
Regsvr32 - register/de-register DLL/OCX/ActiveX
Regwiz - Reistration wizard
Sfc /scannow - Sytem File Checker
Sndrec32 - Sound Recorder
Sndvol32 - Volume control for soundcard
Sysedit - Edit system startup files (config.sys, autoexec.bat, win.ini, etc.)
Systeminfo - display various system information in text console
Taskmgr - Task manager
Telnet - Telnet program
Taskkill - kill processes using command line interface
Tskill - reduced version of Taskkill from Windows XP Home
Tracert - Traces and displays all paths required to reach an internet host
Winchat - simple chat program for Windows networks
Winipcfg - Displays IP configuration

Management Consoles
certmgr.msc - Certificate Manager
ciadv.msc - Indexing Service
compmgmt.msc - Computer management
devmgmt.msc - Device Manager
dfrg.msc - Defragment
diskmgmt.msc - Disk Management
fsmgmt.msc - Folder Sharing Management
eventvwr.msc - Event Viewer
gpedit.msc - Group Policy -XP Pro only
iis.msc - Internet Information Services
lusrmgr.msc - Local Users and Groups
mscorcfg.msc - Net configurations
ntmsmgr.msc - Removable Storage
perfmon.msc - Performance Manager
secpol.msc - Local Security Policy
services.msc - System Services
wmimgmt.msc - Windows Management

Shortcuts
access.cpl - Accessibility Options
hdwwiz.cpl - Add New Hardware Wizard
appwiz.cpl - dd/Remove Programs
timedate.cpl - Date and Time Properties
desk.cpl - Display Properties
inetcpl.cpl - Internet Properties
joy.cpl - Joystick Properties
main.cpl keboard - Keyboard Properties
main.cpl - Mouse Properties
ncpa.cpl - Network Connections
ncpl.cpl - Network Properties
telephon.cpl - Phone and Modem options
powercfg.cpl - Power Management
intl.cpl - Regional settings
mmsys.cpl sounds - Sound Properties
mmsys.cpl - Sounds and Audio Device Properties
sysdm.cpl - System Properties
nusrmgr.cpl - User settings
firewall.cpl - Firewall Settings (sp2)
wscui.cpl - Security Center (sp2)

Windows Environment Commands
%ALLUSERSPROFILE% - Open the All User's Profile
%HomeDrive% - Opens your home drive e.g. C:\
%UserProfile% - Opens you User's Profile
%temp% Opens - temporary file Folder
%systemroot% - Opens Windows folder

Wupdmgr - Takes you to Microsoft Windows Update

General keyboard shortcuts
CTRL+C(Copy)
CTRL+X (Cut)
CTRL+Z (Undo)
DELETE (Delete)
SHIFT+DELETE (Delete the selected item permanently without placing the item in the Recycle Bin)
CTRL while dragging an item (Copy the selected item)
CTRL+SHIFT while dragging an item (Create a shortcut to the selected item)
F2 key (Rename the selected item)
CTRL+RIGHT ARROW (Move the insertion point to the beginning of the next word)
CTRL+LEFT ARROW (Move the insertion point to the beginning of the previous word)
CTRL+DOWN ARROW (Move the insertion point to the beginning of the next paragraph)
CTRL+SHIFT with any of the arrow keys (Highlight a block of text)
CTRL+UP ARROW (Move the insertion point to the beginning of the previous paragraph)
SHIFT with any of the arrow keys (Select more than one item in a window or on the desktop, or select text in a document)
CTRL+A (Select all)
F3 key (Search for a file or a folder)
ALT+ENTER (View the properties for the selected item)
ALT+F4 (Close the active item, or quit the active program)
ALT+ENTER (Display the properties of the selected object)
ALT+SPACEBAR (Open the shortcut menu for the active window)
CTRL+F4 (Close the active document in programs that enable you to have multiple documents open simultaneously)
ALT+TAB (Switch between the open items)
ALT+ESC (Cycle through items in the order that they had been opened)
F6 key (Cycle through the screen elements in a window or on the desktop)
F4 key (Display the Address bar list in My Computer or Windows Explorer)
SHIFT+F10 (Display the shortcut menu for the selected item)
ALT+SPACEBAR (Display the System menu for the active window)
CTRL+ESC (Display the Start menu)
ALT+Underlined letter in a menu name (Display the corresponding menu)
Underlined letter in a command name on an open menu (Perform the corresponding command)
F10 key (Activate the menu bar in the active program)
RIGHT ARROW (Open the next menu to the right, or open a submenu)
LEFT ARROW (Open the next menu to the left, or close a submenu)
F5 key (Update the active window)
BACKSPACE (View the folder one level up in My Computer or Windows Explorer)
ESC (Cancel the current task)
SHIFT when you insert a CD-ROM into the CD-ROM drive (Prevent the CD-ROM from automatically playing)
CTRL+SHIFT+ESC (Open Task Manager)

Dialog box keyboard shortcutsIf you press SHIFT+F8 in extended selection list boxes, you enable extended selection mode. In this mode, you can use an arrow key to move a cursor without changing the selection. You can press CTRL+SPACEBAR or SHIFT+SPACEBAR to adjust the selection. To cancel extended selection mode, press SHIFT+F8 again. Extended selection mode cancels itself when you move the focus to another control.

CTRL+TAB (Move forward through the tabs)
CTRL+SHIFT+TAB (Move backward through the tabs)
TAB (Move forward through the options)
SHIFT+TAB (Move backward through the options)
ALT+Underlined letter (Perform the corresponding command or select the corresponding option)
ENTER (Perform the command for the active option or button)
SPACEBAR (Select or clear the check box if the active option is a check box)
Arrow keys (Select a button if the active option is a group of option buttons)
F1 key (Display Help)
F4 key (Display the items in the active list)
BACKSPACE (Open a folder one level up if a folder is selected in the Save As or Open dialog box)

Microsoft natural keyboard shortcuts
Windows Logo+BREAK (Display the System Properties dialog box)
Windows Logo+D (Display the desktop)
Windows Logo+M (Minimize all of the windows)
Windows Logo+SHIFT+M (Restore the minimized windows)
Windows Logo+E (Open My Computer)
Windows Logo+F (Search for a file or a folder)
CTRL+Windows Logo+F (Search for computers)
Windows Logo+F1 (Display Windows Help)
Windows Logo+ L (Lock the keyboard)
Windows Logo+R (Open the Run dialog box)
Windows Logo+U (Open Utility Manager)

Accessibility keyboard shortcuts
Right SHIFT for eight seconds (Switch FilterKeys either on or off)
Left ALT+left SHIFT+PRINT SCREEN (Switch High Contrast either on or off)
Left ALT+left SHIFT+NUM LOCK (Switch the MouseKeys either on or off)
SHIFT five times (Switch the StickyKeys either on or off)
NUM LOCK for five seconds (Switch the ToggleKeys either on or off)
Windows Logo +U (Open Utility Manager)

Windows Explorer keyboard shortcuts
END (Display the bottom of the active window)
HOME (Display the top of the active window)
NUM LOCK+Asterisk sign (*) (Display all of the subfolders that are under the selected folder)
NUM LOCK+Plus sign (+) (Display the contents of the selected folder)
NUM LOCK+Minus sign (-) (Collapse the selected folder)
LEFT ARROW (Collapse the current selection if it is expanded, or select the parent folder)
RIGHT ARROW (Display the current selection if it is collapsed, or select the first subfolder)

Shortcut keys for Character Map
After you double-click a character on the grid of characters, you can move through the grid by using the keyboard shortcuts
RIGHT ARROW (Move to the right or to the beginning of the next line)
LEFT ARROW (Move to the left or to the end of the previous line)
UP ARROW (Move up one row)
DOWN ARROW (Move down one row)
PAGE UP (Move up one screen at a time)
PAGE DOWN (Move down one screen at a time)
HOME (Move to the beginning of the line)
END (Move to the end of the line)
CTRL+HOME (Move to the first character)
CTRL+END (Move to the last character)
SPACEBAR (Switch between Enlarged and Normal mode when a character is selected)

Microsoft Management Console (MMC) main window keyboard shortcuts
CTRL+O (Open a saved console)
CTRL+N (Open a new console)
CTRL+S (Save the open console)
CTRL+M (Add or remove a console item)
CTRL+W (Open a new window)
F5 key (Update the content of all console windows)
ALT+SPACEBAR (Display the MMC window menu)
ALT+F4 (Close the console) • ALT+A (Display the Action menu)
ALT+V (Display the View menu)
ALT+F (Display the File menu)
ALT+O (Display the Favorites menu)

MMC console window keyboard shortcuts
CTRL+P (Print the current page or active pane)
ALT+Minus sign (-) (Display the window menu for the active console window)
SHIFT+F10 (Display the Action shortcut menu for the selected item)
F1 key (Open the Help topic, if any, for the selected item)
F5 key (Update the content of all console windows)
CTRL+F10 (Maximize the active console window)
CTRL+F5 (Restore the active console window)
ALT+ENTER (Display the Properties dialog box, if any, for the selected item)
F2 key (Rename the selected item)
CTRL+F4 (Close the active console window. When a console has only one console window, this shortcut closes the console)

Remote desktop connection navigation
CTRL+ALT+END (Open the Microsoft Windows NT Security dialog box)
ALT+PAGE UP (Switch between programs from left to right)
ALT+PAGE DOWN (Switch between programs from right to left)
ALT+INSERT (Cycle through the programs in most recently used order)
ALT+HOME (Display the Start menu)
CTRL+ALT+BREAK (Switch the client computer between a window and a full screen)
ALT+DELETE (Display the Windows menu)
CTRL+ALT+Minus sign (-) (Place a snapshot of the entire client window area on the Terminal server clipboard and provide the same functionality as pressing ALT+PRINT SCREEN on a local computer.)
CTRL+ALT+Plus sign (+) (Place a snapshot of the active window in the client on the Terminal server clipboard and provide the same functionality as pressing PRINT SCREEN on a local computer.)

Microsoft Internet Explorer navigationCTRL+B (Open the Organize Favorites dialog box)
CTRL+E (Open the Search bar)
CTRL+F (Start the Find utility)
CTRL+H (Open the History bar)
CTRL+I (Open the Favorites bar)
CTRL+L (Open the Open dialog box)
CTRL+N (Start another instance of the browser with the same Web address)
CTRL+O (Open the Open dialog box, the same as CTRL+L)
CTRL+R (Update the current Web page)
CTRL+ CTRL+P (Open the Print dialog box)
W (Close the current window)

Note Some keyboard shortcuts may not work if StickyKeys is turned on in Accessibility Options, Some of the Terminal Services client shortcuts that are similar to the shortcuts in Remote Desktop Sharing are not available when you use Remote Assistance in Windows XP Home Edition.

Microsoft Office run commands
If the Microsoft Office is installed you can use following run commands to run its components.

winword – Microsoft Word
excel – Microsoft Excel
powerpnt – Microsoft PowerPoint
msaccess – Microsoft Access
outlook – Microsoft Outlook
ois – Microsoft Picture Manage

Tuesday, February 26, 2013

Hidden files in your Pendrive (How to show the hidden files in pendrive? )

See the secret in ur Pendrive.
Try This out.


If ur file is there in ur Pendrive, shows the property and don’t show the files after showing the hidden files also.

Open a Notepad
Copy the following text to it.

@echo off
attrib –s –h  /s /d


Save it as Hidden.bat in ur pendrive.

Sunday, February 24, 2013

VB6 Start Button Control, Customize Start Menu


Copy and paste the following code
---------------------------------------
Option Explicit

'The FindWindow function retrieves a handle to the top-level window whose class name and window name match the specified strings
Private Declare Function FindWindow Lib "user32" Alias "FindWindowA" (ByVal lpClassName As String, ByVal lpWindowName As String) As Long

'The FindWindowEx function retrieves a handle to a window whose class name and window name match the specified strings
Private Declare Function FindWindowEx Lib "user32" Alias "FindWindowExA" (ByVal hWnd1 As Long, ByVal hWnd2 As Long, ByVal lpsz1 As String, ByVal lpsz2 As String) As Long

'The ShowWindow function sets the specified window's show state
Private Declare Function ShowWindow Lib "user32" (ByVal hwnd As Long, ByVal nCmdShow As Long) As Long

Private Const SW_SHOW = 5 'Shows A Window
Private Const SW_HIDE = 0 'Hides A Window


Private Sub Command1_Click()
    Dim TaskBarWin As Long 'TaskBar Window
    Dim StartButton As Long 'Start Button Window
    TaskBarWin = FindWindow("shell_traywnd", vbNullString) 'Get Taskbar Window
    StartButton = FindWindowEx(TaskBarWin, 0&, "button", vbNullString) 'Get StartButton Window
    Call ShowWindow(StartButton, SW_HIDE)
End Sub

To Get Getback the Button
    Dim TaskBarWin As Long 'TaskBar Window
    Dim StartButton As Long 'Start Button Window
    TaskBarWin = FindWindow("shell_traywnd", vbNullString) 'Get Taskbar Window
    StartButton = FindWindowEx(TaskBarWin, 0&, "button", vbNullString) 'Get StartButton Window
    Call ShowWindow(StartButton, SW_SHOW)   

Computer Format with Windows 7 ( CD or DVD )

 १. सर्बप्रथम त हजुर्संगा एउटा Windows 7 को CD or DVD हुन जरुरी छ त्यो पक्कै पनि छ होला हजुरसँग यदी छैन भने कसरी हुन्छ Arrange गर्नुहोला हुन त Internet बाट पनि Free Version को पाइन्छ Windows Download गर्न को लागी तपाइंले Google मा गएर Download Windows 7 अथवा कुन Version को चाहिएको हो त्यसको नाम Type गरेर Search गर्ने हो भने थुप्रै Site हरु का Link देखिन्छन Download को लागी

र ठिक छ सबैभन्दा पहिला Windows CD or DVD लाई Computer मा लगाउनुहोस (Install) गर्नुहोस

२. Windows CD / DVD Computer मा Install भैसकेपछी अब Computer लाई "Restart" गर्नुहोस

३. Computer बन्द भएर खुल्ने बेलामा (Restart) त्यहाँ Computer Screen को माथी "Press any key to boot from CD or DVD.._ " भनेर लेखेको हुनेछ त्यती बेला तपाइंले आफ्नो Computer को Keyboard बाट कुनै पनि एक Button दबाउनुहोला ध्यान दिनुहोला यो "Press any key to boot from CD or DVD.._ " Screen मा धेरै समय सम्म देखाईरहंदैन त्यसैले छिटो-छिटो त्यो Message देखाएको बेलामा कुनै पनि एक Button दबाउनुहोला Keyboard बाट र अर्को कुरा यदी Computer मा Windows CD or DVD Install नगरी Computer Restart गर्यो भने पनि "Press any key to boot from CD or DVD.._ " यस्तो लेखेको देखाउँदैन

र यदी हजुरले Logon Password बिर्सिएर Format गरेपछी मात्रै खोल्न मिल्ने हुनाले Computer नखोली बस्नु भएको छ भने Format गर्नको लागी Computer Swich On गर्नुस र Logon Password सम्म जानुस त्यहाँ PAssword Type गरेर Enter गर्नुस यदी Wrong भयो भने Windows CD or DVD लाई Computer मा लागौनुस र एकछीन पर्खनुहोस अनि Computer लाई Right Side को तल Shut down संगै रहेको Category Icn मा Click गरेर Restart गर्नुहोस अनि यहाँ माथी भने झैं "Press any key to boot from CD or DVD.._ " keyboard बाट कुनै एक key थिच्नुहोस

४. त्यसपछी अब त्यहाँ एउटा "Windows Boot Manager" को Windows खुल्नेछ र हजुरलाई दुइओटा Options दिएको हुन्छ जस्तै "Windows Setup [EMS Enabled] र तल "Tools" भन्दा मुनी "Windows memory diagnostic" तपाइंले Keyboard बाट "TAB" लेखेको button लाई थिचेर माथी "Windows Setup [EMS Enabled] लेखेको Message मा Tab लाई लैजानुहोस र अब Keyboard बाट "Enter" Button थिच्नुहोस

५. त्यसपछी अब त्यहाँ "Windows is loading files..." लेखेको Message तपाइंले देख्नुहुनेछ केही समय पर्खानुहोला

६. त्यसपछी अब त्यहाँ खुलेको Windows मा तपाइंले भाषा चयन गर्नुपर्ने हुन्छ Category Icon मा Click गरेर आफुले कुन भाषा चाहेको हो त्यसमा चयन गर्नुहोस तिनै ठाउँमा चयन गर्नुहोला जस्तै यहाँ तल हेर्नुस मैले तिनै ठाउँमा English राखेको छु र शाहेद हजुरले राख्नु पर्ने पनि यही हो र त्यसपछी अब तल "Next" Button दबाउनुहोस

७. हजुरले त्यहाँ Language Choose गरीसकेपछी त्यस खुलेको अर्को Windows मा "Install now" मा Click गर्नुहोस

८. त्यसपछी फेरी अब केही समय पर्खनुहोस "Setup is Starting..." भनेको छ Wait गर्नुहोला

९. Setup is Starting... Finish भैसकेपछी त्यहाँ फेरी अर्को Windows खुल्नेछ र अब त्यहाँ हजुरले त्यस Windows को Left side तल "I accept the license terms" मा Check mark लगाएर "Next" Button थिच्नुहोस

१०. त्यसपछी अब त्यहाँ फेरी अर्को "Which type of instalition do you want?" लेखेको Windows खुल्नेछ तपाइंले मात्र त्यहाँ तल "Custom Advanced" मा Click गर्नुहोस

११. अब त्यहाँ खुलेको अर्को Windows को तल Right side मा हेर्नुहोस "Drive options (advanced)" लेखेको छ त्यहाँ Click गर्नुहोस

१२. "Drive options (advanced)"मा हजुरले Click गरीसकेपछी अब त्यहाँ माथी को Disk मा Click गर्नुहोस

१३. त्यसपछी अब त्यहाँ एउटा सानो Dialog Box खुल्नेछ त्यसमा "Yes" Button दबाउनुहोस

१४. अब केहि समय पर्खनुहोस अनि त्यहाँ तल बाट "Next" Button मा थिच्नुहोस

१५. Next Button थिचिसकेपछी अब त्यहाँ हेर्नुहोस "Installing Windows..." भनेको छ केहि समय पर्खनुहोस केहि समय पछी आँफै अर्को Windows खुल्नेछ

१६. त्यसपछी त्यहाँ पनि हजुरले केहि नगर्नुहोला "Setup is updating registry setting" भनेको छ केहि समय पछी फेरी अर्को Windows खुलेछ तपाईं मात्र केहि समय पर्खनुहोस

१७. अब त्यहाँ खुलेको अर्को Windows मा पनि केहि नगरी त्यत्तिकै हेरिराख्नुस तर यदी हजुर चाहनुहुन्छ भने केहि Settings अदलबदल गर्न सक्नुहुन्छ त्यसको लागी त्यहाँ तल Shortcut keys दिएको छ जस्तै F2, F12, ESC तर तपाइंले केहि पनि गर्नु जरुरी छैन त्यसैले केहि पनि नगरी केहि छीन पर्खनुहोस

१८. र अब त्यहाँ "Press any key to boot from CD or DVD.._ " भनेको हुन्छ तर तपाइंले केहि पनि नगर्नुहोला

१९. त्यसपछी अब त्यहाँ अर्को एउटा Windows खुल्नेछ त्यो हो तपाइंले आफुले चाहेको User Name लेख्ने हो अब त्यहाँ तपाइं के नाम राख्न चाहनुहुन्छ त्यहाँ Type गरेर तल "Next" गर्नुहोला

२०. अब फेरी अर्को Windows खुलेको हुन्छ त्यो हो Password को लागी यदी तपाईं Password पनि राख्न चाहनुहुन्छ भने राख्नुस तर नराख्दा पनि हुन्छ र अब तल "Next" Button थिच्नुहोस

२१. आब त्यहाँ खुलेको अर्को Windows भनेको चाहिं तपाइंले Windows को Product key: Type गर्नु पर्ने ठाउँ हो यदी Product key छ भने त्यहाँ Type गर्नुस अथवा छैन भने तल "Next" Button थिच्नुहोस

२२. अब त्यहाँ खुलेको अर्को Windows मा तपाइंलाई तिन प्रश्न सोधेको हुन्छ त्यी मध्य हजुरले सबै भन्दा माथीको "Use recommended settings" मा Click गर्दा राम्रो हुन्छ

२३. र त्यसपछी त्यहाँ खुलेको अर्को windows मा भने तपाइंले आफु बसेको Country को Time अथवा अरु कुनै आफ्नो इच्छाले Time and Date Settings गर्नुहोस अनि तल "Next" Button दबाउनुहोस

२४. त्यसपछी फेरी अब त्यहाँ खुलेको अर्को Windows मा "Select your computer's current location" भनेको छ मतलब तपाईंको Network कस्तो हो त्यहाँ तल Options दिएको छ मैले चाहिं "Home Network" मा Click गरेको छु र शाहेद हजुरको पनि Home Network नै हुनुपर्छ त्यसैमा Click गर्नुहोस

२५.र अब केहि छीन पर्खनुहोला केहि समयपछी आँफै अर्को Windows खुल्नेछ

२६. अब त्यहाँ खुलेको windows मा आफ्नो Network को Password मागेको छ यदी हजुरसँग Network को Password छ भने राख्नुस छैन भने तल "Skip" Button मा थिच्नुहोस

२७. अब तपाईंले गर्नु पर्ने Click गर्नु पर्ने Button हरु सिध्दियो भने नि हुन्छ कम्मरमा हात बाँधेर बस्नुस बाँकी काम Computer आँफैले गर्छ र केहि समय पछी आँफै Windows Desktop मा System हरु देखिनेछ

२८. केहि समय पछी Automatic Windows को Programs System हरु देखिएपछी त्यहि समय त्यहाँ Taskbar को Right side मा "Downloading and installing Updates" लेखेको एउटा Notification देखिनेछ त्यसमा Click गरेर हेर्नुहोस Windows Update हुन थालेको छ की छैन

२९. Automatic हुन थालेको हुनुपर्छ यदी बहेको छैन भने Update गर्नुस "Download" Button मा Click गरेर तर पनि Automatic भएको हुनुपर्छ

Congratulations to you for your success तपाइंलाई धेरै-धेरै बधाई छ तपाईं सफल हुनुभयो र अब तपाईंको Computer भर्खर किनेर ल्याएको जस्तै भयो आफुलाई चाहिने Applications भने फेरी Install गर्नु पर्ने हुन्छ त्यो त तपाइंलाई नि थाहा छ होला

र हजुरलाई जानकारी गराउन चाहन्छु यदी हजुर अहिले नै Computer Format गर्न चाहनुहुन्छ भने पहिला यस तरीकालाई राम्रो संग पढ्नुस अथवा एक खाली कापीको पन्नामा तरीका लेख्नुस अनि Format गर्नतिर लाग्नुस कस्तो लाग्यो यो तरीका हजुरलाई कृपया तल Comment box मा प्रशंसा गर्न नबिर्सनु होला है धन्यबाद